[Backend] Authentication
1. Tokens
Alice Onboarding uses JSON Web Tokens (JWT) to manage its authentication. There are four different types of tokens:
| Token | Description |
|---|---|
| LOGIN_TOKEN | Basic access token |
| BACKEND_TOKEN | For global operations only available in the backend (e.g. creating/deleting a user) |
| USER_TOKEN | For user-related operations available in the frontend (e.g. upload a selfie, upload a document, …) |
| BACKEND_TOKEN_WITH_USER_ID | For backend operations related to users (e.g. delete user, get user's report, …) |
The LOGIN_TOKEN is required for obtaining the rest of the tokens. Both USER_TOKEN and BACKEND_TOKEN_WITH_USER_ID
also require a user_id, which is obtained when creating a new user in Alice Onboarding.
Warning
All four tokens last for 60 minutes. For security reasons, you must
never use a BACKEND_TOKEN or a BACKEND_TOKEN_WITH_USER_ID in the
frontend of your application or malicious users could discover them in
your source code. You should only use them server-side.
2. How to implement the authentication flow
Here you will learn how to integrate Alice Onboarding in your backend to automate the onboarding of your clients. Your backend will be in charge of managing authentications and all kinds of user-related operations.
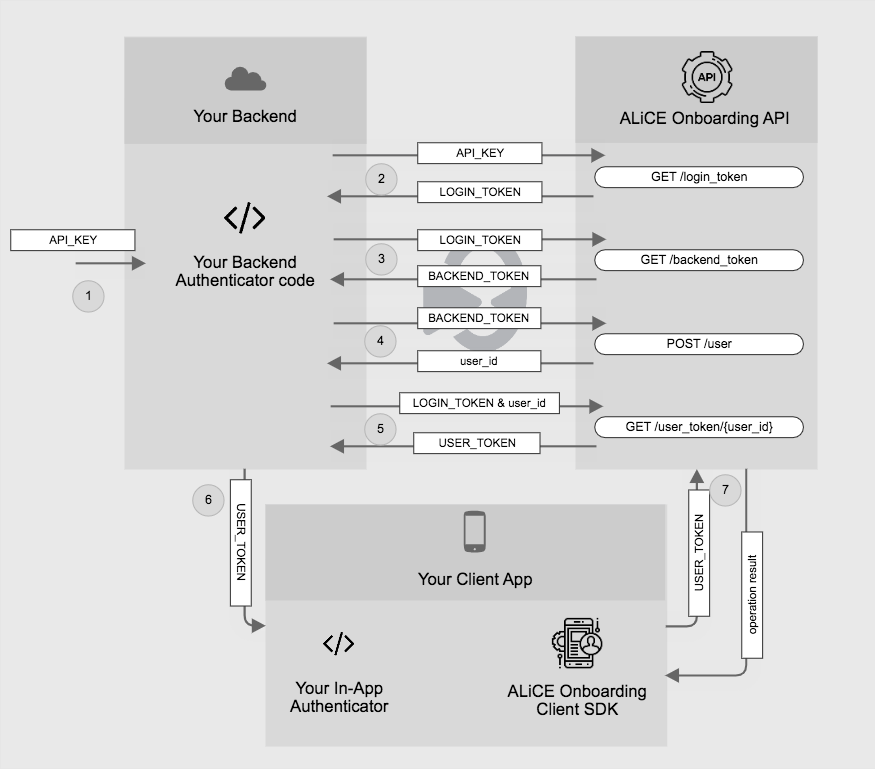
The following diagram explains the authentication flow.
-
Get your
API_KEYprovided within your credentials. -
Your backend gets a
LOGIN_TOKENfrom the Alice Onboarding service using yourAPI_KEY.curl --request GET \ --url https://apis.alicebiometrics.com/onboarding/login_token \ --header 'apikey: <YOUR-API-KEY>'⏩ Go directly to the next step. Python SDK adeptly handles this process for us in an optimized manner. -
Your backend asks for a
BACKEND_TOKENusing theLOGIN_TOKEN.curl --request GET \ --url https://apis.alicebiometrics.com/onboarding/backend_token \ --header 'Authorization: Bearer <LOGIN_TOKEN>'from alice import Auth, Config, Onboarding config = Config(api_key="<YOUR-API-KEY>") auth = Auth.from_config(config) backend_token = auth.create_backend_token().unwrap_or_raise() -
Using the
BACKEND_TOKEN, your backend creates a new user on the onboarding service. This is a must before starting the onboarding flow.curl --request POST \ --url https://apis.alicebiometrics.com/onboarding/user \ --header 'Authorization: Bearer <BACKEND_TOKEN> \ --header 'Content-Type: multipart/form-data' --form email=example@example.com'onboarding = Onboarding.from_config(config) user_id = onboarding.create_user().unwrap_or_raise() -
Using both the
user_idandLOGIN_TOKEN, your backend asks for aUSER_TOKEN.curl --request GET \ --url https://apis.alicebiometrics.com/onboarding/user_token/<user_id> \ --header 'Authorization: Bearer <LOGIN_TOKEN>'user_token = auth.create_user_token(user_id=user_id).unwrap_or_raise() -
Your app receives the
USER_TOKENfrom your backend and injects the token into our client SDK. Now the client-side SDK is ready to operate against the Alice Onboarding API. -
The client SDK uses the
USER_TOKENto upload selfies, documents, and other user operations.
Tip
The tokens have a duration of 1 hour. You can set Cache-Control header to enhance the efficiency of token requests. When this parameter is set to use-cache, the API stores the last valid token in a cache for a period of 30 minutes. Consequently, during this interval, the default token duration of 60 minutes will progressively decrease, ensuring a minimum token validity of at least 30 minutes (60 minutes - 30 minutes cached).
curl --request GET \
     --url https://apis.alicebiometrics.com/onboarding/backend_token \
     --header 'Authorization: Bearer <LOGIN_TOKEN>'
--header 'Cache-Control: use-cache'
from alice import Auth, Config, Onboarding

config = Config(api_key="<YOUR-API-KEY>", use_cache=True)
auth = Auth.from_config(config)
backend_token = auth.create_backend_token().unwrap_or_raise()
Note
By leveraging the Python SDK, you can detach your code from the intricacies of token management. Simply integrate
your API_KEY into the configuration, and then initiate various actions as illustrated in the following onboarding
example.
from alice import Config, Onboarding

config = Config(api_key=api_key, verbose=verbose)
onboarding = Onboarding.from_config(config)

selfie_media_data = given_any_selfie_image_media_data()
document_front_media_data = given_any_document_front_media_data()
document_back_media_data = given_any_document_back_media_data()

user_id = onboarding.create_user().unwrap_or_raise()

onboarding.get_user_status(user_id).unwrap_or_raise()

# Upload a selfie (Recommended 1-second video)
onboarding.add_selfie(
    user_id=user_id, media_data=selfie_media_data
).unwrap_or_raise()

# Create and upload front and back side from a document
document_id = onboarding.create_document(
    user_id=user_id, type=DocumentType.ID_CARD, issuing_country="ESP"
).unwrap_or_raise()
onboarding.add_document(
    user_id=user_id,
    document_id=document_id,
    media_data=document_front_media_data,
    side=DocumentSide.FRONT,
    manual=True,
).unwrap_or_raise()
onboarding.add_document(
    user_id=user_id,
    document_id=document_id,
    media_data=document_back_media_data,
    side=DocumentSide.BACK,
    manual=True,
).unwrap_or_raise()

# Generate the report
report = onboarding.create_report(
    user_id=user_id, version=Version.V1
).unwrap_or_raise()