Document OCR
Alice Onboarding is a complete solution created for onboarding, but flexible enough to enable other use cases through the same API and SDKs without any additional complexity.
Here you will find how to easily build a document OCR use case with Alice Onboarding.
Document OCR flow
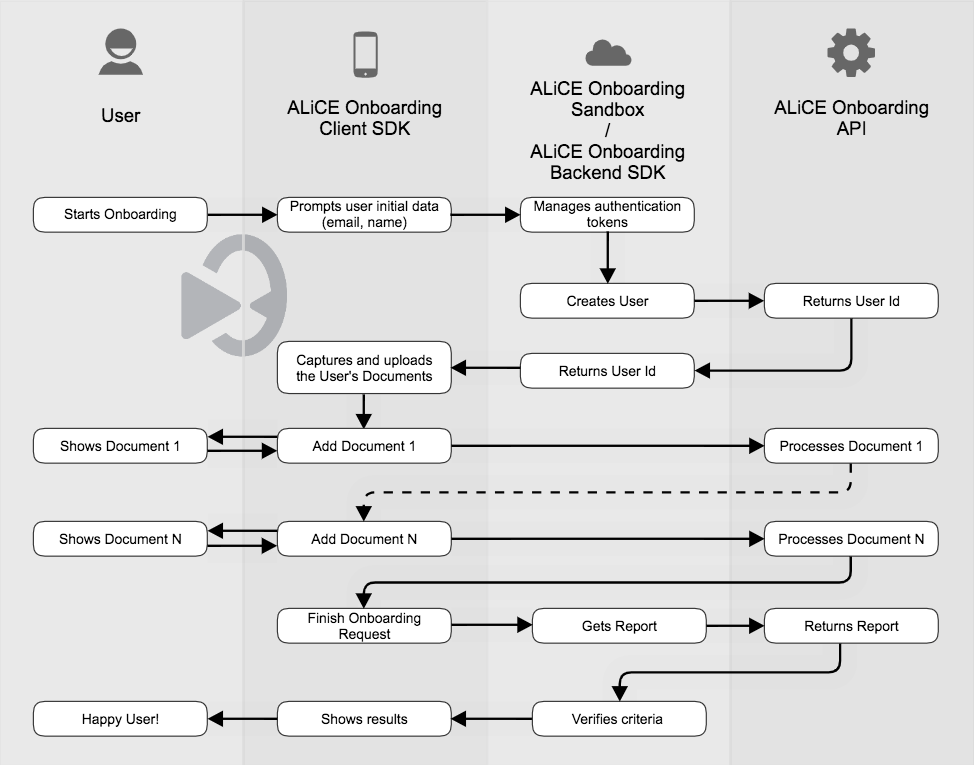
The document OCR process can be divided into 3 steps:
- User creation: your backend registers a new user.
- Document adding : the user uploads documents to the Alice Onboarding platform.
- Report processing: your backend gets the documents reports and checks the results.
1. User creation
Create a user from your backend in the Alice Onboarding API.
curl --request POST \
--url https://apis.alicebiometrics.com/onboarding/user \
--header 'Authorization: Bearer <BACKEND_TOKEN>' \
--header 'Content-Type: multipart/form-data' \
--form email=example@example.com
from alice import Config, Onboarding

ALICE_ONBOARDING_API_KEY="<YOUR-API-KEY>"

config = Config(api_key=ALICE_ONBOARDING_API_KEY)
onboarding = Onboarding.from_config(config)

user_id =  onboarding.create_user().unwrap_or_throw()
2. Document adding
At your frontend, you must create a document associated with that user and add the photos of the document sides (add_front and add_back). This can be done manually by calling the API or automatically by taking advantage of the capture functionalities of the SDKs.
curl --request POST \
--url https://apis.alicebiometrics.com/onboarding/user/document \
--header 'Authorization: Bearer <USER_TOKEN>' \
--header 'Content-Type: multipart/form-data' \
--form type=<DOCUMENT_TYPE> \
--form issuing_country=<ISSUING_COUNTRY>

curl --request PUT \
--url https://apis.alicebiometrics.com/onboarding/user/document \
--header 'Authorization: Bearer <USER_TOKEN>' \
--header 'Content-Type: multipart/form-data' \
--form document_id=<DOCUMENT_ID> \
--form side=<DOCUMENT_SIDE> \
--form image=@/path/to/doc/image.jpeg \
--form manual=true \
--form source=file
from alice import Config, Onboarding

ALICE_ONBOARDING_API_KEY="<YOUR-API-KEY>"

config = Config(api_key=ALICE_ONBOARDING_API_KEY)

 //Create and upload front and back side from a document
document_id = onboarding.create_document(
user_id=user_id, type="idcard", issuing_country="ESP"
).unwrap()

DOCUMENT_FRONT_MEDIA_DATA=open(f"{RESOURCES_PATH}/idcard_esp_front_example.png", "rb").read()
onboarding.add_document(
user_id=user_id,
document_id=document_id,
media_data=DOCUMENT_FRONT_MEDIA_DATA,
side="front",
manual=True,
)

DOCUMENT_BACK_MEDIA_DATA=open(f"{RESOURCES_PATH}/idcard_esp_back_example.png", "rb").read()
onboarding.add_document(
user_id=user_id,
document_id=document_id,
media_data=DOCUMENT_BACK_MEDIA_DATA,
side="back",
manual=True,
)
let userToken = "<ADD-YOUR-USER-TOKEN-HERE>"

let config = OnboardingConfig.builder()
    .withUserToken(userToken)
    .withAddDocumentStage(ofType: .idcard, issuingCountry: "ESP")

let onboarding = Onboarding(self, config: config)
onboarding.run { result in
    switch result {
    case let .success(userStatus):
        print("userStatus: \(String(describing: userStatus))")
    case let .failure(error):
        print("failure: \(error.localizedDescription)")
    case .cancel:
        print("User has cancelled the onboarding")
    }
}
val userToken = "<ADD-YOUR-USER-TOKEN-HERE>"

val config = OnboardingConfig.builder()
    .withUserToken(userToken)
    .withAddDocumentStage(type = DocumentType.IDCARD, issuingCountry = "ESP")

val onboarding = Onboarding(this, config: config)
onboarding.run(ONBOARDING_REQUEST_CODE)

...

override fun onActivityResult(requestCode: Int, resultCode: Int, data: Intent?) {
    super.onActivityResult(requestCode, resultCode, data)
        if (requestCode == ONBOARDING_REQUEST_CODE) {
            if (resultCode == Activity.RESULT_OK) {
                val userInfo = data!!.getStringExtra("userStatus")
        } else if (resultCode == Activity.RESULT_CANCELED) {

        }
    }
}
String userToken = "<ADD-YOUR-USER-TOKEN-HERE>"

OnboardingConfig config = OnboardingConfig.CREATOR.builder().withUserToken(userToken);
config.withAddDocumentStage(DocumentType.IDCARD, "ESP");

Onboarding onboarding = new Onboarding(
        this,
        config
);

onboarding.run(ONBOARDING_REQUEST_CODE);

...

@Override
protected void onActivityResult(int requestCode, int resultCode, @Nullable Intent data) {
    super.onActivityResult(requestCode, resultCode, data);
    if (requestCode == ONBOARDING_REQUEST_CODE) {
        switch (resultCode) {
            case Activity.RESULT_OK:
                Log.d("ONBOARDING_RESULT", data.getStringExtra("userStatus"););
                break;
            case Activity.RESULT_CANCELED:
                Log.d("ONBOARDING_RESULT", "Onboarding canceled");
                break;
            case ONBOARDING_ERROR:
                Log.d("ONBOARDING_RESULT", data.getParcelableExtra("onboardingError").toString());
                break;
        }
    }
}
let userToken = "<ADD-YOUR-USER-TOKEN-HERE>"
let config = new aliceonboarding.OnboardingConfig()
    .withUserToken(userToken)
    .withAddDocumentStage(aliceonboarding.DocumentType.IDCARD)

function onSuccess(userInfo) {console.log("onSuccess: " + userInfo)}
function onFailure(error) {console.log("onFailure: " + error)}
function onCancel() { console.log("onCancel")}

new aliceonboarding.Onboarding("alice-onboarding-mount", config).run(onSuccess, onFailure, onCancel);
3. Report processing
From your backend, you can obtain the read fields for such document
through a get Report request to the
Alice Onboarding API.
curl --request GET \
--url https://apis.alicebiometrics.com/onboarding/user/report \
--header 'Authorization: Bearer <BACKEND_TOKEN_WITH_USER_ID>' \
--header 'Content-Type: multipart/form-data'
    from alice import Config, Onboarding

    ALICE_ONBOARDING_API_KEY="<YOUR-API-KEY>"

    config = Config(api_key=ALICE_ONBOARDING_API_KEY)

    report = onboarding.create_report(
    user_id=user_id
    ).unwrap_or_throw()
If the document's results do not fulfill your criteria (see How to accept a document), you should invalidate (void) the user's document and ask him/her to capture again.
    curl --request PATCH \
    --url https://apis.alicebiometrics.com/onboarding/user/document/<DOCUMENT_ID> \
    --header 'Authorization: Bearer <BACKEND_TOKEN_WITH_USER_ID>' \
    --header 'Content-Type: application/merge-patch+json' \
    --data '{"voided": true}'
    from alice import Config, Onboarding

    ALICE_ONBOARDING_API_KEY="<YOUR-API-KEY>"

    config = Config(api_key=ALICE_ONBOARDING_API_KEY)

    onboarding.void_document(
    user_id=user_id,
    document_id=document_id
    ).unwrap_or_throw()
How to accept a document
In this section we show you how to analyze the reading results of a document and define your acceptance criteria.
0. Get the document report
The document report collects all the necessary info to accept or deny a document. Take a look at the Document report included at the documents array.
{
 "created_at": "2021-07-20T15:16:33.845112",
 "documents": [
      {
       "checks": [],
       "created_at": "2021-03-02T09:13:15",
       "id": "67101f93-5525-48b9-aced-67bf557a6382",
       "meta": {},
       "sides": {},
       "summary_fields": []
      }
 ],
 "events": [],
 "id": "8d2ce06e-a80e-47a3-8095-ab7a677675a8",
 "selfies": [],
 "summary": {},
 "user_id": "deb78277-af90-47b6-b3b7-461129a819bf",
 "version": 1
}
1. Check if the document is complete
The first step is to check whether the document is complete. This means that every side was successfully uploaded.
If it is incomplete, you should invalidate (void) the document and ask the user to capture it again.
{
   "created_at": "2021-07-20T15:16:33.845112",
   "documents": [
        {
         "checks": [],
         "created_at": "2021-03-02T09:13:15",
         "id": "67101f93-5525-48b9-aced-67bf557a6382",
         "meta": {
              "completed": true,
              "issuing_country": "AUTO",
              "type": "passport",
              "voided": false
         },
         "sides": {},
         "summary_fields": []
        }
   ],
   "events": [],
   "id": "8d2ce06e-a80e-47a3-8095-ab7a677675a8",
   "selfies": [],
   "summary": {},
   "user_id": "deb78277-af90-47b6-b3b7-461129a819bf",
   "version": 1
 }
2. Define your document checks
Our API implements some checks that might be suitable for you to accept or deny a document. For instance, checking whether the document has expired, whether the document is fake, etc.
The Report includes Check elements.These are collected at the checks array of the Document report. Please see which are available at the Document-level-checks section.
Each check has a value between 0-100 or null. If its value is greater or equal to 50, the condition is met. Null values mean that the check does not apply. Therefore, a null value should never be a reason for rejection. It only means that there is not enough evidence to compute it.
If the checks you have selected are not met, you should invalidate (void) the document and ask the user to capture it again.
{
 "created_at": "2021-07-20T15:16:33.845112",
 "documents": [
      {
       "checks": [
            {},
            {},
            {
             "detail": "The document has not expired",
             "key": "unexpired_document",
             "value": 100
            },
            {},
            {},
            {}
       ],
       "created_at": "2021-03-02T09:13:15",
       "id": "67101f93-5525-48b9-aced-67bf557a6382",
       "meta": {},
       "sides": {},
       "summary_fields": []
      }
 ],
 "events": [],
 "id": "8d2ce06e-a80e-47a3-8095-ab7a677675a8",
 "selfies": [],
 "summary": {},
 "user_id": "deb78277-af90-47b6-b3b7-461129a819bf",
 "version": 1
}
3. Define and check your key fields
First, you need to define which common document fields are suitable for your use case. Please check the Fields per document section.
Most customers choose at least these 5 fields:
first_namelast_namebirth_dateexpiration_dateid_number/license_number/passport_number
You will find all the fields read by Alice OCR technology at the summary_fields section of the Document report. A Document Field contains:
- A
name - A
value - A
score, which holds the reading confidence - An array of Check elements see Field-level checks
A field is considered as well read if one of these two conditions is met:
- The
checked_fieldcheck IS in the array of checks and its value is greater than or equal to 50. - The
checked_fieldcheck IS NOT in the array of checks but the field's score is greater than or equal to 70.
If none of these is fulfilled, you should invalidate (void) the document and ask the user to capture it again.
{
 "created_at": "2021-07-20T15:16:33.845112",
 "documents": [
    {
     "checks": [],
     "created_at": "2021-03-02T09:13:15",
     "id": "67101f93-5525-48b9-aced-67bf557a6382",
     "meta": {},
     "sides": {},
     "summary_fields": [
        {
         "checks": [
            {
            "detail": "The field passes its checksum",
            "key": "checked_field",
            "value": 100
            }
         ],
         "name": "id_number",
         "score": 91,
         "value": "99999999R"
        }
     ]
    }
 ],
 "events": [],
 "id": "8d2ce06e-a80e-47a3-8095-ab7a677675a8",
 "selfies": [],
 "summary": {},
 "user_id": "deb78277-af90-47b6-b3b7-461129a819bf",
 "version": 1
}