Biometric Login
Alice Onboarding is a complete solution created for onboarding, but flexible enough to enable other use cases through the same API and SDKs without any additional complexity.
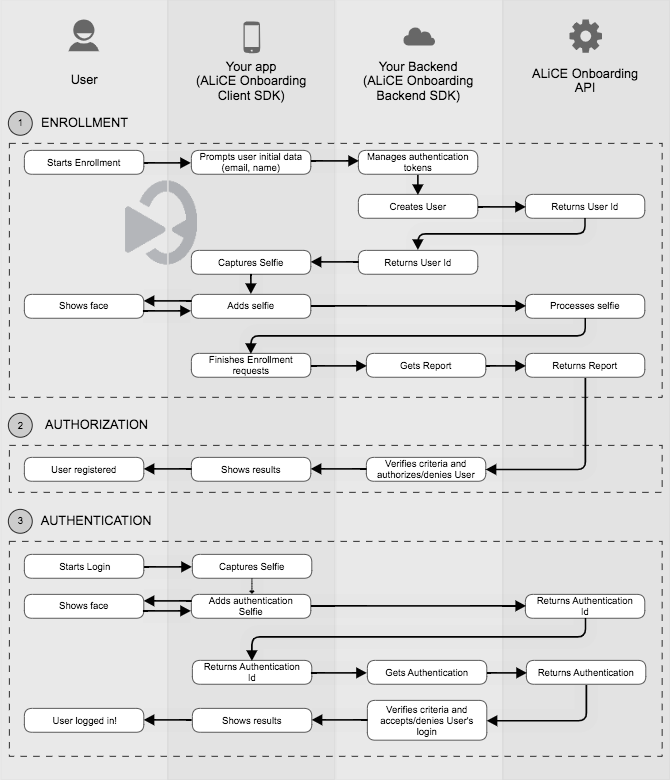
Here you will find how to easily build a biometric login use case with Alice Onboarding. In a typical login use case, a user registers itself with a selfie. After a while, the user authenticates with a new selfie and is accepted or rejected based on the facial resemblance to the registration selfie.
Login flow
The login process can be divided into 3 steps:
- Enrollment: the user registers with a selfie.
- Enablement: your backend reviews the enrollment and approves/denies the user to perform logins.
- Authentication: the user authenticates against the enrollment selfie.
1. Enrollment
1.1 User creation
Create a user from your backend in the Alice Onboarding API.
curl --request POST \
--url https://apis.alicebiometrics.com/onboarding/user \
--header 'Authorization: Bearer <BACKEND_TOKEN>' \
--header 'Content-Type: multipart/form-data' \
--form email=example@example.com
from alice import Config, Onboarding

ALICE_ONBOARDING_API_KEY="<YOUR-API-KEY>"

config = Config(api_key=ALICE_ONBOARDING_API_KEY)
onboarding = Onboarding.from_config(config)

user_id =  onboarding.create_user().unwrap_or_throw()
1.2 Add selfie
From the client-side, the user captures and sends a selfie. This can be done manually by calling the API or automatically by taking advantage of the capture functionalities of the SDKs.
curl --request POST \
--url https://apis.alicebiometrics.com/onboarding/user/selfie \
--header 'Authorization: Bearer <USER_TOKEN>' \
--header 'Content-Type: multipart/form-data' \
--form video=@/path/to/selfie/video.mp4
from alice import Config, Onboarding

ALICE_ONBOARDING_API_KEY="<YOUR-API-KEY>"

config = Config(api_key=ALICE_ONBOARDING_API_KEY)

//Upload a selfie (Recommended 1-second video)
SELFIE_MEDIA_DATA=open(f"{RESOURCES_PATH}/selfie.png", "rb").read()
onboarding.add_selfie(
user_id=user_id, media_data=SELFIE_MEDIA_DATA
)
let userToken = "<ADD-YOUR-USER-TOKEN-HERE>"

let config = OnboardingConfig.builder()
    .withUserToken(userToken)
    .withAddSelfieStage()

let onboarding = Onboarding(self, config: config)
onboarding.run { result in
    switch result {
    case let .success(userStatus):
        print("userStatus: \(String(describing: userStatus))")
    case let .failure(error):
        print("failure: \(error.localizedDescription)")
    case .cancel:
        print("User has cancelled the onboarding")
    }
}
val userToken = "<ADD-YOUR-USER-TOKEN-HERE>"

val config = OnboardingConfig.builder()
    .withUserToken(userToken)
    .withAddSelfieStage()

val onboarding = Onboarding(this, config: config)
onboarding.run(ONBOARDING_REQUEST_CODE)

    …

override fun onActivityResult(requestCode: Int, resultCode: Int, data: Intent?) {
    super.onActivityResult(requestCode, resultCode, data)
        if (requestCode == ONBOARDING_REQUEST_CODE) {
            if (resultCode == Activity.RESULT_OK) {
                val userInfo = data!!.getStringExtra("userStatus")
        } else if (resultCode == Activity.RESULT_CANCELED) {

        }
    }
}
const ONBOARDING_CONFIG = {
    "stages": [
       {"stage": "addSelfie"},
    ]
}

<Onboarding
    userToken={userToken}
    config={ONBOARDING_CONFIG}
    onSuccess={(userStatusJson) => console.log("onSuccess:" + userStatusJson) }
    onFailure={(failureJson) => console.log("onFailure:" + failureJson) }
    onCancel={(value) => console.log("onCancel:" + value) }
/>
let userToken = "<ADD-YOUR-USER-TOKEN-HERE>";
let config = new aliceonboarding.OnboardingConfig()
  .withUserToken(userToken)
  .withAddSelfieStage();

function onSuccess(userInfo) {
  console.log("onSuccess: " + userInfo);
}
function onFailure(error) {
  console.log("onFailure: " + error);
}
function onCancel() {
  console.log("onCancel");
}

new aliceonboarding.Onboarding("alice-onboarding-mount", config).run(
  onSuccess,
  onFailure,
  onCancel
);
1.3 Report
From your backend, ask for the Report to check the enrollment selfie.
curl --request GET \
--url https://apis.alicebiometrics.com/onboarding/user/report \
--header 'Authorization: Bearer <BACKEND_TOKEN_WITH_USER_ID>' \
--header 'Content-Type: multipart/form-data'
from alice import Config, Onboarding

ALICE_ONBOARDING_API_KEY="<YOUR-API-KEY>"

config = Config(api_key=ALICE_ONBOARDING_API_KEY)

report = onboarding.create_report(
user_id=user_id
).unwrap_or_throw()
To approve the enrollment selfie, you will have to check its liveness score.
{
"created_at": "2021-07-20T14:13:12.295516",
"documents": [],
"events": [],
"id": "22e50a8c-1ff7-4e97-87b2-59b042a2e3d2",
"selfies": [{
    "checks": [
     {
        "detail": "The selfie is from a real person",
        "key": "liveness",
        "value": 78.25
     },
     {},
    ],
    "created_at": "2021-11-09T09:16:11",
    "id": "505b89cc-6799-4167-8f97-5d3ac6d07a6c",
    "media": {},
    "number_of_faces": 1,
    "voided": false
}],
"summary": {},
"user_id": "deb78277-af90-47b6-b3b7-461129a819bf",
"version": 1
}
Reference liveness threshold: 50
If the liveness score is below the recommended threshold, you should void the user's selfie and ask the user to start the enrollment again.
curl --request PATCH \
--url https://apis.alicebiometrics.com/onboarding/user/selfie \
--header 'Authorization: Bearer <BACKEND_TOKEN_WITH_USER_ID>'
from alice import Config, Onboarding

ALICE_ONBOARDING_API_KEY="<YOUR-API-KEY>"

config = Config(api_key=ALICE_ONBOARDING_API_KEY)

onboarding.void_selfie(
user_id=user_id
).unwrap_or_throw()
2. Enablement
An enabled user is allowed to use some additional features (e.g authenticate with the face). This is a must in order to enable the user to perform logins.
curl --request POST \
--url https://apis.alicebiometrics.com/onboarding/user/authentication/enable \
--header 'Authorization: Bearer <BACKEND_TOKEN_WITH_USER_ID>'
from alice import Config, Onboarding

ALICE_ONBOARDING_API_KEY="<YOUR-API-KEY>"

config = Config(api_key=ALICE_ONBOARDING_API_KEY)

onboarding.authorize_user(
    user_id=user_id
).unwrap_or_throw()
3. Authentication (Login)
After a while, you may want to authenticate a previously registered user against a given media to verify its identity.
3.1 User authentication
In the same way as with the enrollment, from the client-side, the user captures and sends a selfie with the Alice Onboarding Client SDK. The
authentication endpoint returns an authentication_id that you should send to your backend.
curl --request POST \
--url https://apis.alicebiometrics.com/onboarding/user/authenticate \
--header 'Authorization: Bearer <USER_TOKEN>' \
--header 'Content-Type: multipart/form-data' \
--form video=@/path/to/selfie/video.mp4
Use the respective Authenticate command detailed in the MOBILE SDKs > Onboarding Commands section
Use the Authenticate command detailed in the WEB SDK > Web Onboarding Commands section
3.1 Get authentication
In your backend, use the authentication_id returned in the previous step to get the authentication result.
curl --request GET \
--url https://apis.alicebiometrics.com/onboarding/user/authentication/<AUTHENTICATION_ID> \
--header 'Authorization: Bearer <BACKEND_TOKEN_WITH_USER_ID>' \
--header 'Content-Type: multipart/form-data'
authentication = onboarding.get_authentication(
    user_id=user_id,
    authentication_id=authentication_id
).unwrap_or_throw()
To approve the user's login (authentication) selfie, you will check the result field that can have 3 different values: ok, ko and n/a.
{
  "authentications": [
    {
      "authentication_id": "4c9ec92c-be23-48c0-acdf-48148dddfac4",
      "created_at": "2020-10-27T10:29:00",
      "face_liveness": 90.86,
      "face_matching": 96,
      "media": {
        "video": {
          "extension": "mp4",
          "href": "https://apis.alicebiometrics.com/onboarding/media/4ade786a-97f3-486f-b3e7-07ad29a041c4.mp4/download",
          "objects": null
        }
      },
      "is_injection": true,
      "result": "ok"
    },
    {
      "authentication_id": "3a81e1f6-b60a-417f-a397-866376ba3ee9",
      "created_at": "2020-10-27T09:59:45",
      "face_liveness": 33,
      "face_matching": 95,
      "media": {
        "video": {
          "extension": "mp4",
          "href": "https://apis.alicebiometrics.com/onboarding/media/4ade786a-97f3-486f-b3e7-07ad29a041c4.mp4/download",
          "objects": null
        },
      "is_injection": true,
      "result": "ko"
      }
    }
  ],
  "total": 2,
  "version": 1
}
If the liveness or face matching scores are below the recommended thresholds, you should deny the user's login and ask him/her to repeat the login.