HTML + JS
Alice Onboarding Web SDK allows the automatic capture of documents and video selfie of the user in real time from the camera of your device. It also simplifies the communication with the onboarding API to facilitate rapid integration and development.

Tip
Check our GitHub repo to be aware of our latest releases.
1. Import the library
Warning
As this SDK uses getUserMedia for accessing the webcam a secure context is required when using it.
Alice Onboarding can be used as a NPM module (1.1) or with a regular script tag on your page (1.2). In production environment we strongly recommend use the last stable version. For development environment we recommend use the "latest" version.
1.1 NPM installation & import
The NPM module can be installed as follows:
npm install aliceonboarding@8.0.0
npm install aliceonboarding
Import the NPM package
import { Onboarding, OnboardingConfig, DocumentType } from "aliceonboarding";
import "aliceonboarding/dist/aliceonboarding.css";
1.2 HTML script tag include
The HTML tag can be integrated as follows:
<script src='https://unpkg.com/aliceonboarding@8.0.0/dist/aliceonboarding.min.js'></script>
<link rel="stylesheet" href="https://unpkg.com/aliceonboarding@8.0.0/dist/aliceonboarding.css" />
<script src='https://unpkg.com/aliceonboarding/dist/aliceonboarding.min.js'></script>
<link rel="stylesheet" href="https://unpkg.com/aliceonboarding/dist/aliceonboarding.css" />
Warning
- When using the HTML script you will need to use the
aliceonboardingnamespace (like the examples below). - The NPM module requires ES9.
1.3 HTML integration
Add a div element with onboarding tag inside in your page to load the
Alice Onboarding component. An identifier must be set for this div,
for example alice-onboarding-mount:
<div id="alice-onboarding-mount"/>
2. Authentication
For production environments is mandatory to use your backend to obtain the required USER_TOKEN. You should obtain it from your backend (see Authentication)
You can implement the Authenticator protocol available in the AliceOnboarding framework.
class MyBackendAuthenticator extends aliceonboarding.Authenticator {
  constructor() {
    super();
  }
  execute() {
    return new Promise((resolve, reject) => {
      // Add here your code to retrieve the user token from your backend

      let userToken = "fakeUserToken";
      resolve(userToken);
    });
  }
}
Once you obtain the USER_TOKEN you can configure the environment to use and run de Onboarding Process. Also, you need to configure the environment you want to use (you can choose between production or sandbox, so you need to check the API KEY related to each environment).
let authenticator = MyBackendAuthenticator();

authenticator
  .execute()
  .then((userToken) => {
    // Configure Alice Onboarding with the OnboardingConfig
    // Then, run the Alice Onboarding Flow
  })
  .catch((error) => {
    // Inform the user about authentication errors
  });

// The following line setups the environment for run the SDK
// It is necessary to specify the environment ("production or sandbox") before initialising the SDK.
aliceonboarding.Onboarding.setEnvironment("sandbox");
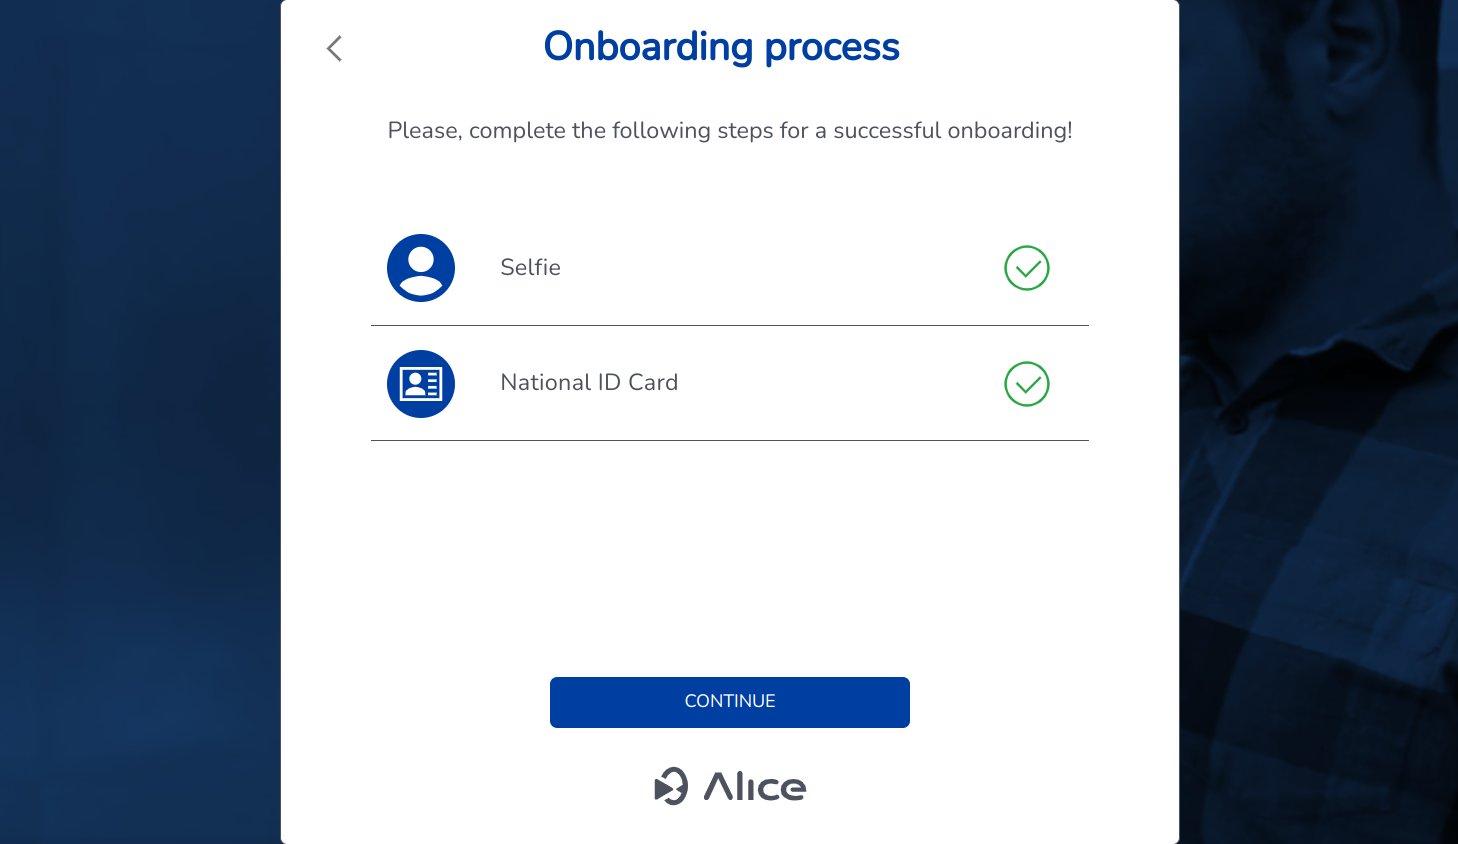
3. Onboarding Flow
You can configure the onboarding flow with the following code:
let userToken = "<ADD-YOUR-USER-TOKEN-HERE>";
let config = new aliceonboarding.OnboardingConfig()
  .withUserToken(userToken)
  .withAddSelfieStage({})
  .withAddDocumentStage({ documentType: aliceonboarding.DocumentType.IDCARD })
  .withAddDocumentStage({ documentType: aliceonboarding.DocumentType.DRIVERLICENSE })
  .withAddOtherTrustedDocumentStage({ title: aliceonboarding.otd.title });
let userToken = "<ADD-YOUR-USER-TOKEN-HERE>";
let config = new aliceonboarding.OnboardingConfig()
  .withUserToken(userToken)
  .withAddSelfieStage()
  .withAddDocumentStage(aliceonboarding.DocumentType.IDCARD)
  .withAddDocumentStage(aliceonboarding.DocumentType.DRIVERLICENSE)
  .withAddOtherTrustedDocumentStage(aliceonboarding.otd.title);
Where userToken is used to secure requests made by the users on their mobile devices or web clients. You should obtain it from your backend.
3.1 Selfie stage configuration parameters
withAddSelfieStage can be configured the optional parameter
SelfieStageConfig.
SelfieStageConfig constructor has the following parameters names in version greater than 8.0.0 (in versions lower than 8.0.0 parameters must be passed in order):
selfieType: The enumaliceonboarding.SelfieTypeindicates the type of selfie to use. By default, Alice captures the standard selfie (SelfieType.DEFAULT), where users only have to place their face into the drawn oval during 1 second. However, we also offer the SelfieType.WITH_DOCUMENT_CHALLENGE option, where users, apart of complete the step of place their face into the oval, they also need to put the identity document inside a random position.capturerType: type of capturer to use. The enumaliceonboarding.SelfieCapturerTypecan be used to indicate the capturer. Default value isSelfieCapturerType.CAMERAmeaning that the selfie will be recorded using the camera. You can set it toSelfieCapturerType.FILEto use the file upload or set it toSelfieCapturerType.ALLto allow both options to the user.
Warning
The parameter automaticCapture will disappear from version 8.0.0.
automaticCapture: a boolean parameter to indicate if the selfie capture should be triggered manually by clicking a button or automatically when a face is detected. Its default value istrue.cameraType: type of camera to use. The enumaliceonboarding.CameraTypecan be used to indicate the camera. Default value isCameraType.FACEmeaning that the camera facing the user will be used. You can set it toCameraType.BACKto use rear camera. This argument is only used when there are available different cameras on the device.
3.2 Document stage configuration parameters
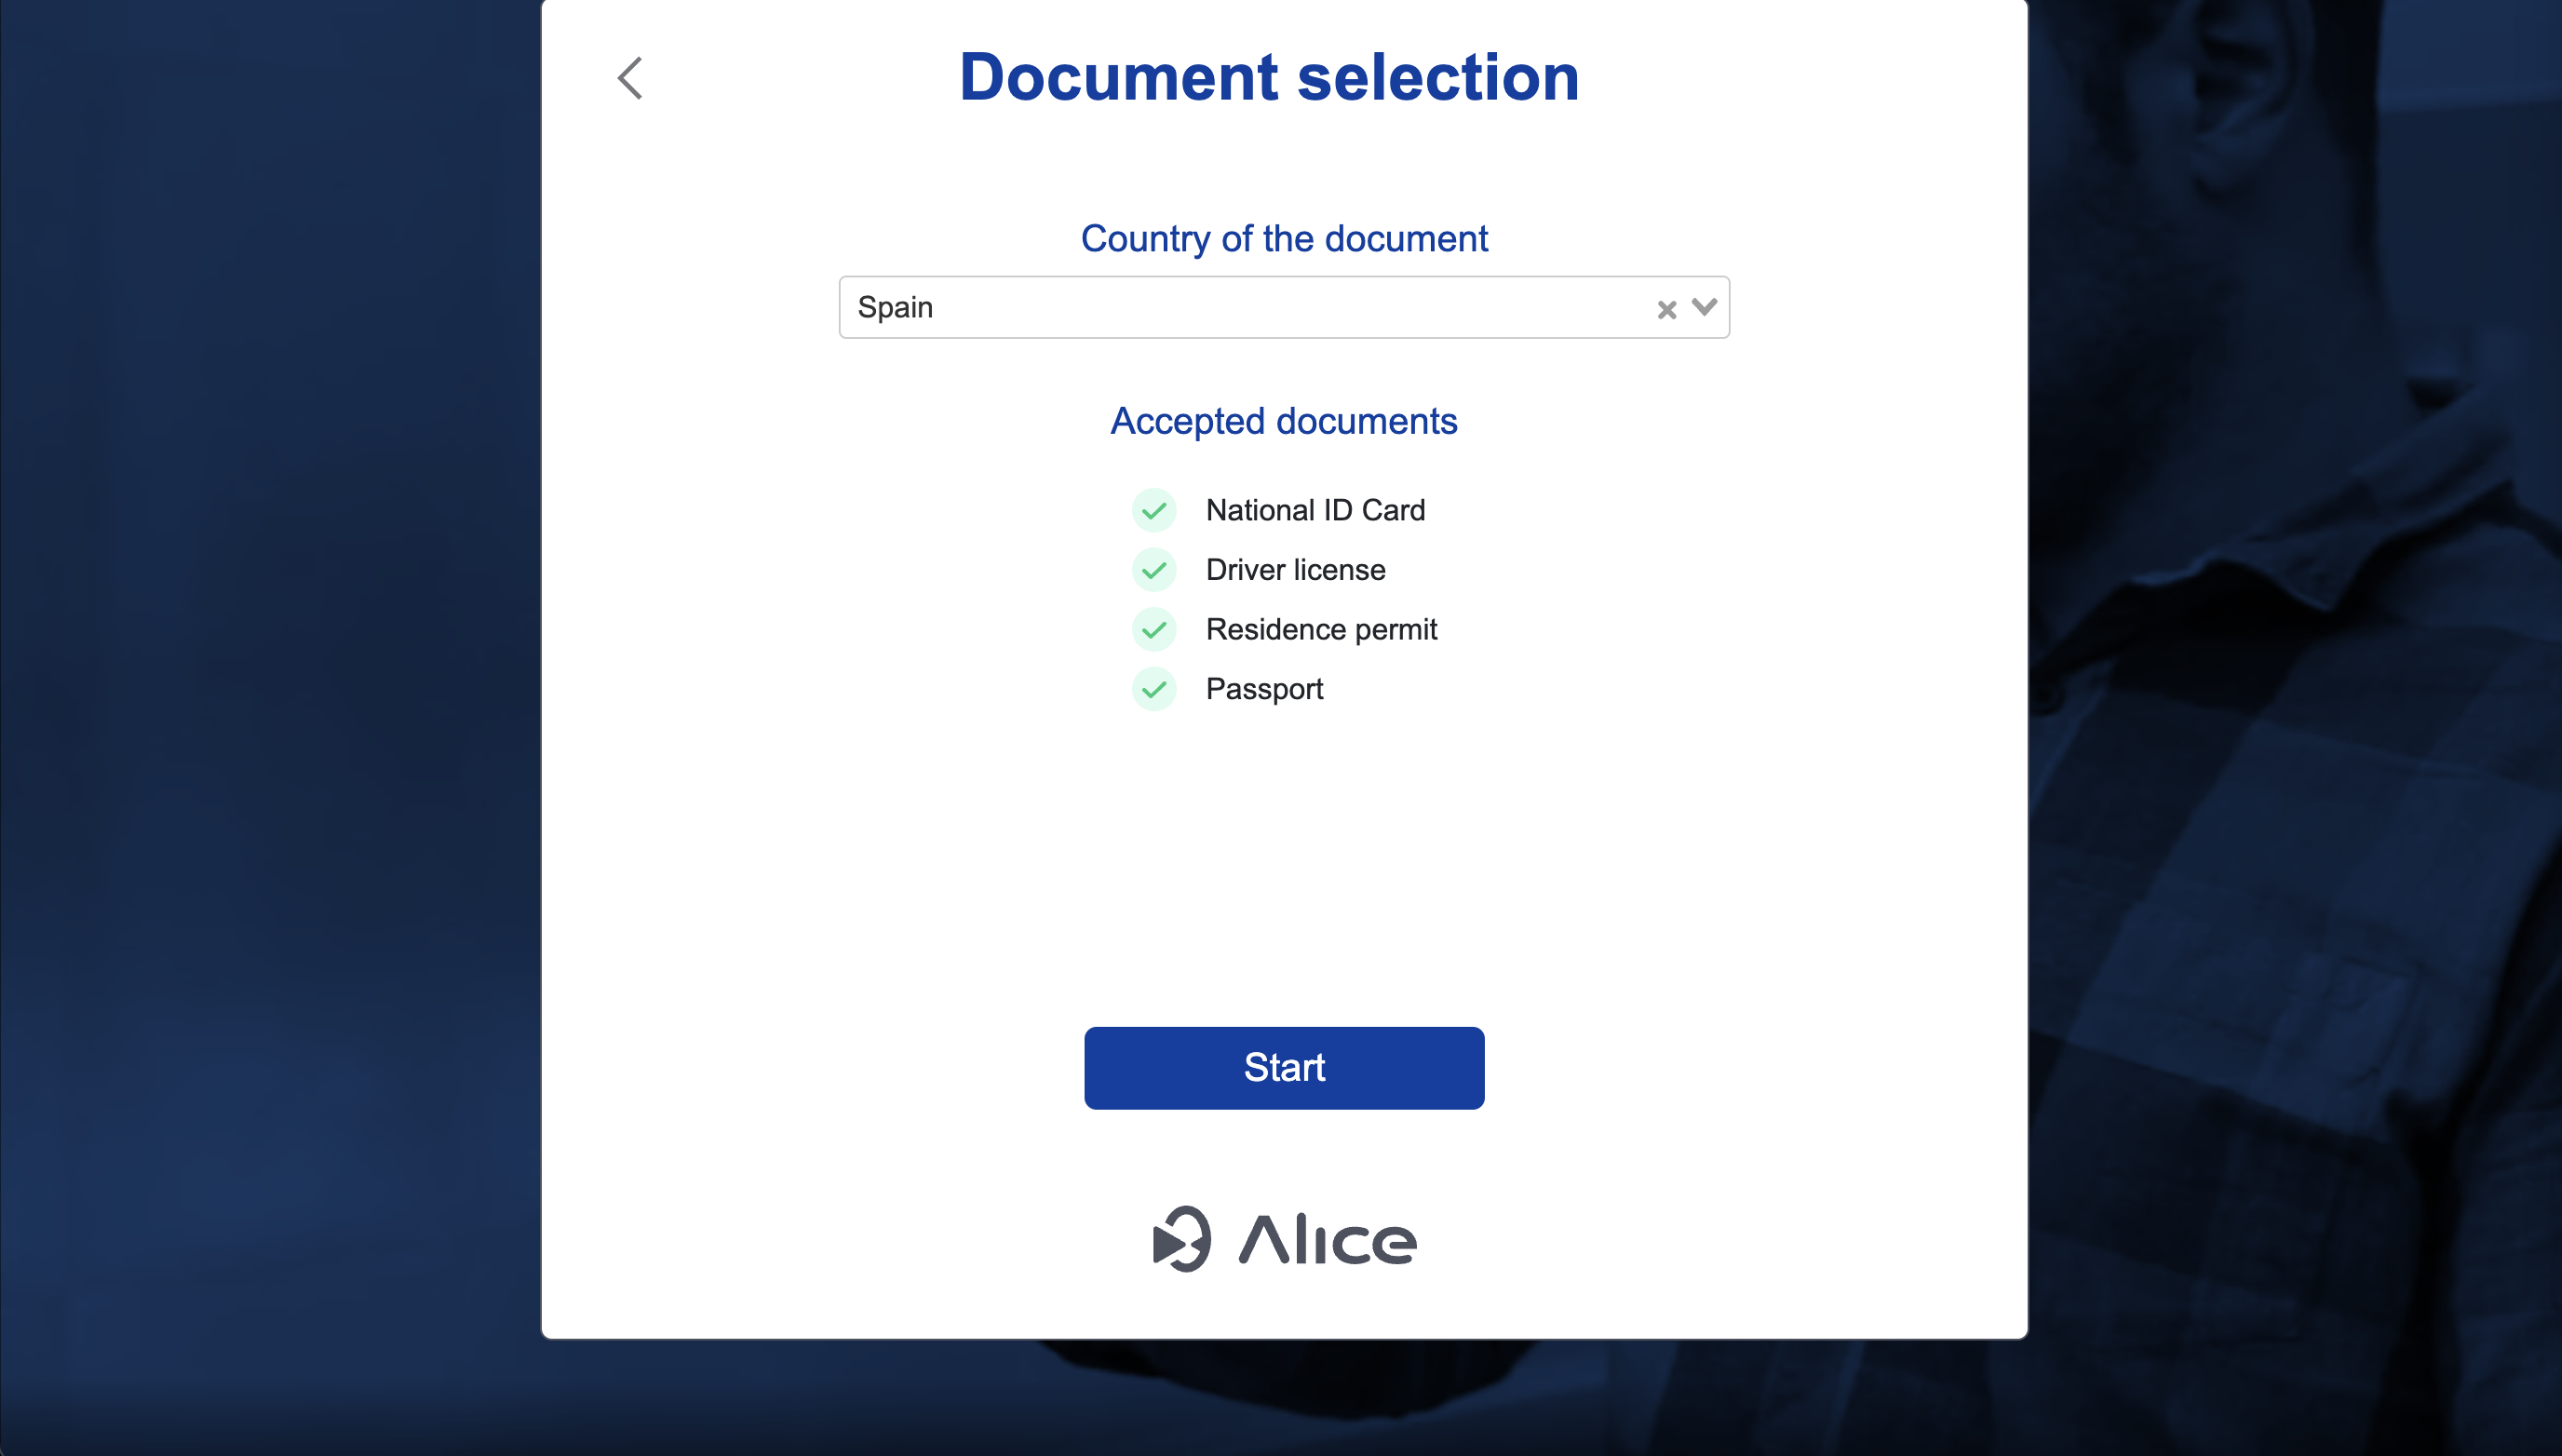
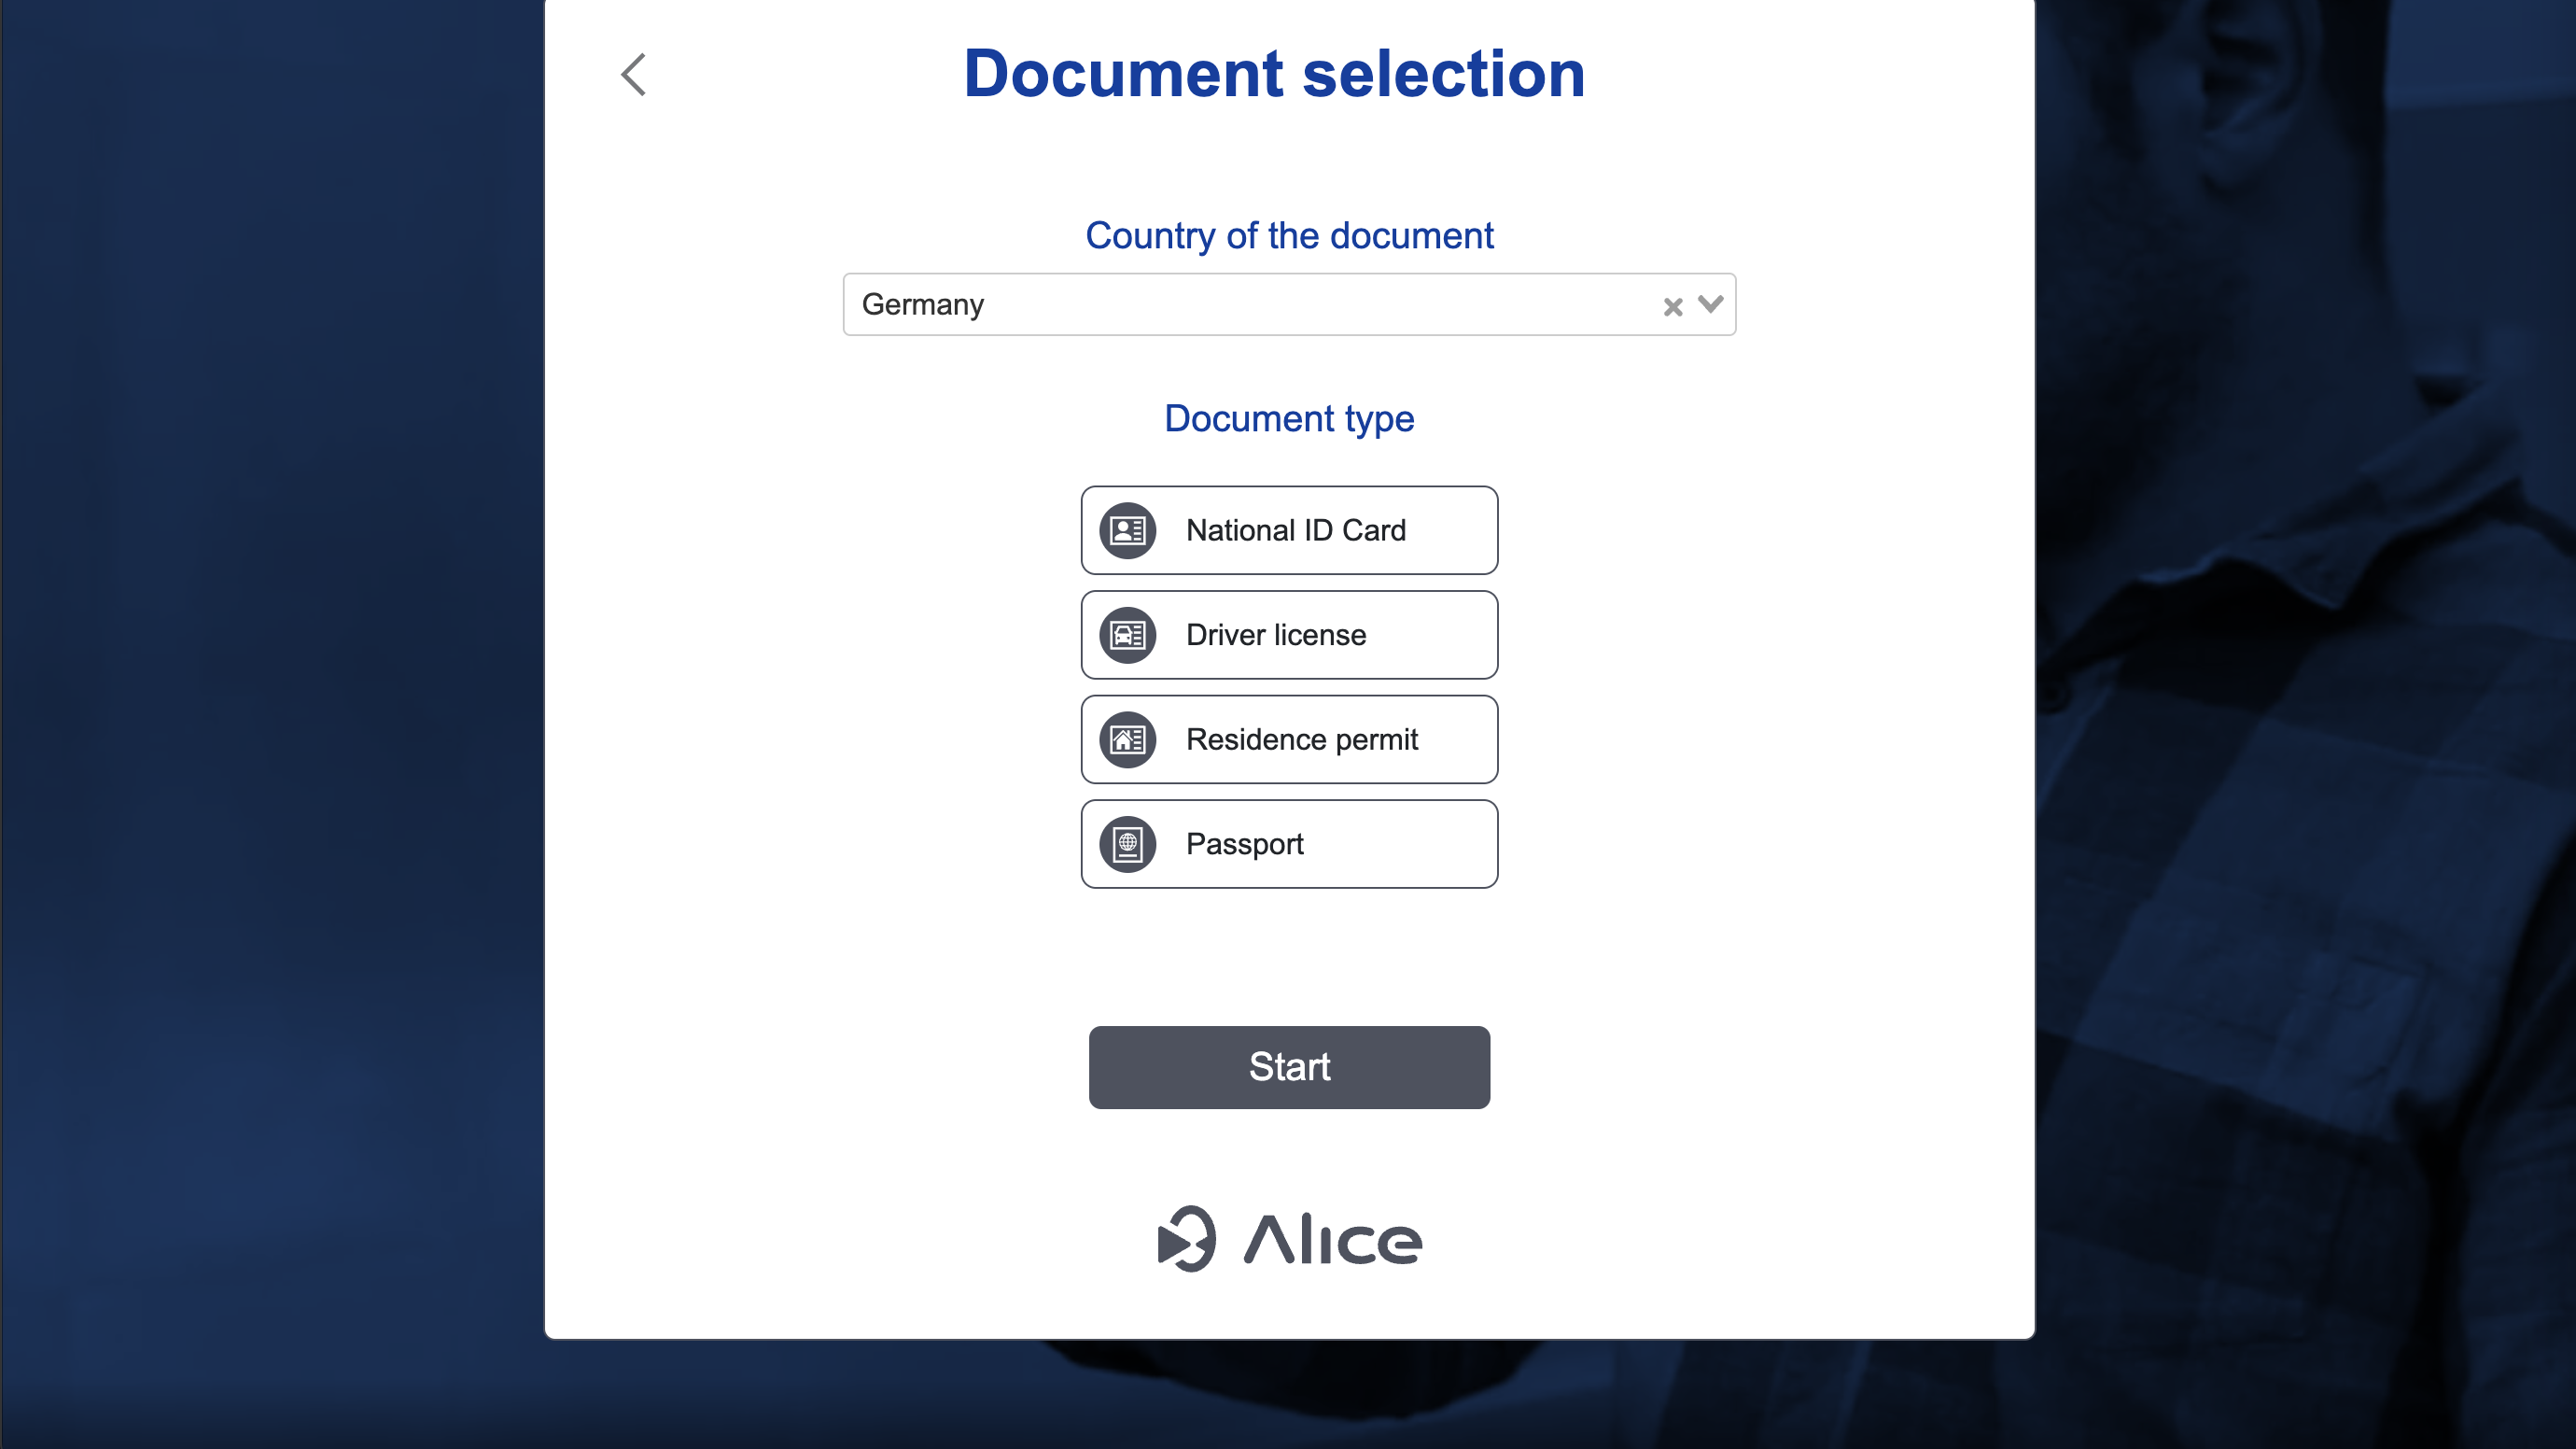
withAddDocumentStage constructor has the following parameters names in version greater than 8.0.0 (in versions lower than 8.0.0 parameters must be passed in order):
documentType: type of document to capture. The enumaliceonboarding.DocumentTypecan be used to indicate the type (id card, driver license, residence permit, passport).issuingCountry: country ISO 3166-1 alpha-3 code. Don't set it to allow the user to choose the country.documentStageConfig: (optional) capture configuration parameters.
DocumentStageConfig encapsulates different capture configuration
parameters. Its constructor has the following parameters names in version greater than 8.0.0 (in versions lower than 8.0.0 parameters must be passed in order):
capturerType: type of capturer to use. The enumaliceonboarding.DocumentCapturerTypecan be used to indicate the capturer. Default value isDocumentCapturerType.CAMERAmeaning that the document capture will be recorded with the camera. You can set it toDocumentCapturerType.FILEto allow just the file upload or set it toDocumentCapturerType.ALLto allow both options to the user.automaticCapture: boolean parameter to indicate if the document capture should be triggered manually by clicking a button or automatically when a document is detected. Default value is false.cameraType: type of camera to use. The enumaliceonboarding.CameraTypecan be used to indicate the camera. Default value isCameraType.BACKmeaning that the rear camera will be used. You can set it toCameraType.FACEto use the frontal camera. This argument is only used when there are available different cameras on the device.manualCaptureTimeout: timeout for showing an alert giving the user the option to start a manual capture when the automatic capture fails to start. Default value is 11000 (ms).attemptsToShowManualAlert: number of attempts of automatic capture before showing an alert giving the user the option to start a manual capture. Default value is 2.
The following example initializes a document capture of Spanish driving licenses only with file upload
let userToken = "<ADD-YOUR-USER-TOKEN-HERE>";
let issuing_country = "ESP";

// Initialise the documentStageConfig classs with your custom config

let documentStageConfig = new aliceonboarding.DocumentStageConfig({
  capturerType: aliceonboarding.DocumentCapturerType.FILE,
  automaticCapture: true,
  cameraType: aliceonboarding.CameraType.BACK
});

let config = new aliceonboarding.OnboardingConfig()
  .withUserToken(userToken)
  .withAddDocumentStage({
    documentType: aliceonboarding.DocumentType.DRIVERLICENSE,
    issuingCountry: issuing_country,
    documentStageConfig: documentStageConfig
  });
let userToken = "<ADD-YOUR-USER-TOKEN-HERE>";
let issuing_country = "ESP";

// Initialise the documentStageConfig classs with your custom config

let documentStageConfig = new aliceonboarding.DocumentStageConfig(
  aliceonboarding.DocumentCapturerType.FILE,
  true,
  aliceonboarding.CameraType.BACK
);

let config = new aliceonboarding.OnboardingConfig()
  .withUserToken(userToken)
  .withAddDocumentStage(
    aliceonboarding.DocumentType.DRIVERLICENSE,
    issuing_country,
    documentStageConfig
  );
The following example initializes a document capture allowing the user to update the document as a file or capture them with the camera. The example also allows the user to select the country for that document
let userToken = "<ADD-YOUR-USER-TOKEN-HERE>";

// Initialise the documentStageConfig classs with your custom config

let documentStageConfig = new aliceonboarding.DocumentStageConfig({
  capturerType: aliceonboarding.DocumentCapturerType.ALL,
});

let config = new aliceonboarding.OnboardingConfig()
  .withUserToken(userToken)
  .withAddDocumentStage({
    documentType: aliceonboarding.DocumentType.DRIVERLICENSE,
    issuingCountry: "SELECT",
    documentStageConfig: documentStageConfig,
  });
let userToken = "<ADD-YOUR-USER-TOKEN-HERE>";

// Initialise the documentStageConfig classs with your custom config

let documentStageConfig = new aliceonboarding.DocumentStageConfig(aliceonboarding.DocumentCapturerType.ALL);

let config = new aliceonboarding.OnboardingConfig()
  .withUserToken(userToken)
  .withAddDocumentStage(
    aliceonboarding.DocumentType.DRIVERLICENSE,
    "SELECT",
    documentStageConfig
  );
3.3 Other Trusted Document stage configuration parameters
This functionality is an easy way to have a document that is not necessarily identification (e. g. proof of address, bill...).
There are two ways to use this feature:
- Uploading a file: It must be a PDF file and less than 10 MB in size.
- Capturing your document: You can add the sheets that are needed from your document. After each capture you can check if the image is correct and to finish you will press the send button that joins all the captures made and will generate a PDF.
withAddOtherTrustedDocumentStage has three arguments:
title: a title for this section during the onboarding process.category: this argument is required if your flow requires multiple documents. You must use this argument to tag each document, for example if your flow requires an invoice and a payslip you could use "invoice" and "payslip" as categories. Note: this argument is case-insensitive.description: optional argument. Allows you to display a description of the document (e.g. given extra information about how the document should be captured) during the onboarding process.capturerType: type of capture to use. The enumaliceonboarding.DocumentCapturerTypecan be used to indicate the capturer. Default value isDocumentCapturerType.CAMERAmeaning that the other trusted document capturer will be recorded with the camera. You can set it toDocumentCapturerType.FILEto allow just the file upload or set it toDocumentCapturerType.ALLto allow both options to the user.
An example of several Other Trusted Documents could be this:
    let userToken = "<ADD-YOUR-USER-TOKEN-HERE>"
    let config = new aliceonboarding.OnboardingConfig()
        .withUserToken(userToken)
        .withAddOtherTrustedDocumentStage({
          title, // required
          category // optional
        })
        .withAddOtherTrustedDocumentStage({
          title: title2, // required
          category: category2 // optional
        })
    let userToken = "<ADD-YOUR-USER-TOKEN-HERE>"
    let config = new aliceonboarding.OnboardingConfig()
        .withUserToken(userToken)
        .withAddOtherTrustedDocumentStage(
          title, // required
          category // optional
        )
        .withAddOtherTrustedDocumentStage(
          title2, // required
          category2 // optional
        )
3.4 Complete Timeout
This functionality allows you to set a timeout on the last part of the process. Once the user has completed all the steps you can complete the process without clicking the "Continue" button.
let completeTimeout = 1; // in ms and always completeTimeout > 0
let userToken = "<ADD-YOUR-USER-TOKEN-HERE>";
let config = new aliceonboarding.OnboardingConfig()
  .withUserToken(userToken)
  .withAddSelfieStage({})
  .withAddDocumentStage({ documentType: aliceonboarding.DocumentType.IDCARD })
  .withCustomParameters(completeTimeout);
let completeTimeout = 1; // in ms and always completeTimeout > 0
let userToken = "<ADD-YOUR-USER-TOKEN-HERE>";
let config = new aliceonboarding.OnboardingConfig()
  .withUserToken(userToken)
  .withAddSelfieStage()
  .withAddDocumentStage(documentType: aliceonboarding.DocumentType.IDCARD)
  .withCustomParameters(completeTimeout);
3.5 QR Redirection feature
This feature allows users who start the onboarding process on desktop to be redirected to their cell phones.
Note
Available since v6.6.4
withQRURL allows you to indicate the URL to which the user will be redirected. This parameter should be the same URL where the user is at the time of starting the onboarding in Alice.
To use it add the parameter withQRURL to the OnboardingConfig()object as follows:
let config = new aliceonboarding.OnboardingConfig()
  .withUserToken(userToken)
  .withAddSelfieStage({})
  .withQRURL({ url: "www.yourcustomurl.com" });
let config = new aliceonboarding.OnboardingConfig()
  .withUserToken(userToken)
  .withAddSelfieStage({})
  .withQRURL("www.yourcustomurl.com");
By default, the SDK will include an option at the bottom for the user to continue in desktop.
If you want the user to always be forced to continue on mobile, set the displayPcButton boolean of the withQRURL method to false.
let config = new aliceonboarding.OnboardingConfig()
  .withUserToken(userToken)
  .withAddSelfieStage({})
  .withQRURL({ url: "www.yourcustomurl.com", displayPcButton: false });
let config = new aliceonboarding.OnboardingConfig()
  .withUserToken(userToken)
  .withAddSelfieStage({})
  .withQRURL("www.yourcustomurl.com", false);
3.6 Any Document stage
Note
Available since v8.0.0
This functionality allows the SDK to try to automatically detect the type of document uploaded by the user. It is not necessary to indicate the document type when initializing the SDK.
let userToken = "<ADD-YOUR-USER-TOKEN-HERE>";
let config = new aliceonboarding.OnboardingConfig()
  .withUserToken(userToken)
  .withAddAnyDocumentStage({});
If the user chooses an issuing country where this functionality is not supported, the user will be shown a selector with the available document types.
withAddAnyDocumentStage feature has 3 arguments:
issuingCountry: country ISO 3166-1 alpha-3 code. Don't set it to allow the user to choose the country.allowedTypes: allows you to restrict the type of document accepted in the process.documentStageConfig: see how to setup the document stage configuration parameters (Note: this feature only accepts camera capture mode, not file!)
Example restricting the documents to IDCARD and Residence Permit:
let acceptedDocumentTypes = [
  aliceonboarding.DocumentType.IDCARD,
  aliceonboarding.DocumentType.RESIDENCEPERMIT,
];
let userToken = "<ADD-YOUR-USER-TOKEN-HERE>";
let config = new aliceonboarding.OnboardingConfig()
  .withUserToken(userToken)
  .withAddAnyDocumentStage({ allowedTypes: acceptedDocumentTypes });
3.7 Run Alice Onboarding
Once you have configured the Alice Onboarding Flow, you can run the process with:
// Setup your environment between "production" or "sandbox".
aliceonboarding.Onboarding.setEnvironment("sandbox");

function onSuccess(userInfo) {
  console.log("onSuccess: " + userInfo);
}
function onFailure(error) {
  console.log("onFailure: " + error);
}
function onCancel() {
  console.log("onCancel");
}

new aliceonboarding.Onboarding({
  idSelector: "alice-onboarding-mount",
  onboardingConfig: config,
}).run(onSuccess, onFailure, onCancel);
// Setup your environment between "production" or "sandbox".
aliceonboarding.Onboarding.setEnvironment("sandbox");

function onSuccess(userInfo) {
  console.log("onSuccess: " + userInfo);
}
function onFailure(error) {
  console.log("onFailure: " + error);
}
function onCancel() {
  console.log("onCancel");
}

new aliceonboarding.Onboarding("alice-onboarding-mount", config).run(
  onSuccess,
  onFailure,
  onCancel
);
3.8 Removing Alice Onboarding
If you are running the onboarding process inside a SPA, you can call the
unmount method to remove the SDK from the current web page. This will
reset its state, so you can restart the onboarding process later on:
const onboarding = new aliceonboarding.Onboarding({ idSelector: "alice-onboarding-mount", onboardingConfig: config });
onboarding.run(onSuccess, onFailure, onCancel);
...
onboarding.unmount();
const onboarding = new aliceonboarding.Onboarding("alice-onboarding-mount", config);
onboarding.run(onSuccess, onFailure, onCancel);
...
onboarding.unmount();
4. Customization
The SDK is provided with themes for:
- Typography ("corporate", "modern", "classic")
- Icons ("classic", "modern", "minimal")
- Icons variant ("circle", "square", "shape")
Note
Default values are in bold.
You can choose the themes with the OnboardingConfig method withTheme.
That has the following parameters:
- theme: Typography theme
- iconTheme: Icon theme (Optional. Default value is "minimal")
- iconVariant: Icon variant (Optional. Default value is "circle")
- style: Custom theme parameters. The SDK expects an Object.
You can customize your Onboarding process with the following parameters
{
  alice_color_primary: "#000e8f",
  alice_color_accent: "black",
  alice_color_secondary: "#4d525f",
  alice_color_background: "white",
  alice_color_check: "#28a745"
  alice_font_family: '"Arial",sans-serif',
  alice_title_font_family: '"Arial",sans-serif',
  alice_title_font_size: "1.2rem",
  alice_title_font_size_desktop: "2.2em",
  alice_subtitle_font_size: "1rem",
  alice_subtitle_font_size_desktop: "1.3rem",
  alice_modal_title_font_size: "1.2rem",
  alice_modal_title_font_size_desktop: "1.5rem",
  alice_input_font_size: "1rem",
  alice_input_font_size_desktop: "1.3rem",
  alice_button_font_size: "1rem",
  alice_button_font_size_desktop: "1.3rem",
  alice_button_font_color: "white",
  alice_button_border_radius: "0.4rem",
  alice_button_height: "2.8rem",
  alice_font_bold_weight: "500",
  alice_letter_spacing: "0.25px",
  alice_title_letter_spacing: "0.25px",
  alice_font_extra_bold_weight: "700",
  alice_mobile_height_container: "94vh"
}
Warning
We don't recommend to change the Height of the capturer, due perfomance and user experiencie.
Example:
let config = new aliceonboarding.OnboardingConfig()
  .withUserToken(userToken)
  .withAddSelfieStage({})
  .withAddDocumentStage({ documentType: aliceonboarding.DocumentType.IDCARD })
  .withTheme({
    theme: "corporate",
    iconTheme: "minimal",
    iconVariant: "square",
    style: {
      alice_color_primary: "orange",
      alice_color_secondary: "grey",
      etc,
    }
  });
let config = new aliceonboarding.OnboardingConfig()
  .withUserToken(userToken)
  .withAddSelfieStage()
  .withAddDocumentStage(aliceonboarding.DocumentType.IDCARD)
  .withTheme("corporate", "minimal", "square", {
      alice_color_primary: "orange",
      alice_color_secondary: "grey",
      etc,
  });
Warning
Only supported with Onboarding Flow.
4.2 Localization
The supported languages are:
| Locale | Code |
|---|---|
| Arabic | ar |
| Catalan | ca |
| German | de |
| Greek | el |
| English | en |
| Spanish | es |
| Basque | eu |
| Finish | fi |
| French | fra |
| Italian | it |
| Galician | gl |
| Dutch | nl |
| Japanese | ja |
| Polish | pl |
| Portuguese | pt |
| Russian | ru |
| Swedish | sv |
| Turkish | tr |
| Simplified Chinese | zh |
By default, the SDK uses English, but the language used can be set
through withCustomLocalization (using ISO 639-1 codes):
let userToken = "<ADD-YOUR-USER-TOKEN-HERE>";
let language = "es";

let config = new aliceonboarding.OnboardingConfig()
  .withUserToken(userToken)
  .withAddSelfieStage({})
  .withAddDocumentStage({ documentType: aliceonboarding.DocumentType.IDCARD })
  .withAddDocumentStage({ documentType: aliceonboarding.DocumentType.DRIVERLICENSE })
  .withCustomLocalization({ language });
let userToken = "<ADD-YOUR-USER-TOKEN-HERE>";
let language = "es";

let config = new aliceonboarding.OnboardingConfig()
  .withUserToken(userToken)
  .withAddSelfieStage()
  .withAddDocumentStage(aliceonboarding.DocumentType.IDCARD)
  .withAddDocumentStage(aliceonboarding.DocumentType.DRIVERLICENSE)
  .withCustomLocalization(language);
Additionally, messages can be overridden with the second argument of
withCustomLocalization. This argument must is an object that maps
languages and strings to override:
    let userToken = "<ADD-YOUR-USER-TOKEN-HERE>";
    let language = "es";
    const customMessages = {"en": {"onboarding_stages_title" : "Hello" }, "es": {"onboarding_stages_title" : "Hola" }};
    let  new aliceonboarding.OnboardingConfig()
        .withUserToken(userToken)
        .withAddSelfieStage({})
        .withCustomLocalization({ language, customMessages });
    let userToken = "<ADD-YOUR-USER-TOKEN-HERE>";
    let language = "es";
    const customMessages = {"en": {"onboarding_stages_title" : "Hello" }, "es": {"onboarding_stages_title" : "Hola" }};
    let  new aliceonboarding.OnboardingConfig()
        .withUserToken(userToken)
        .withAddSelfieStage()
        .withCustomLocalization(language, customMessages);
The default messages can be found here.